Friday, January 5, 2018

How to Unlock an ITEL Phone

Yes! Am back with my knowledge which is helping me and you my dear readers. This is another trick to unlock your ITEL Phone if you have forgotten the password or pattern. the following steps are to be followed if such happens to you
           To unlock the screen of your ITEL phone, wake the screen (by swiping or pressing the Power button) and then enter your password, code, or PIN. If you’re unable to unlock your phone, try signing in with your Google account (for Android 4.4 and below) or using Android Device Manager (5.1 and up). If neither of those methods work, performing a factory reset will help you regain access to your phone.
diasble pattern lock for android
unlock password lock on android
FIRST METHOD: Signing in with your Google Account
1. Attempt to unlock the phone 5 times. This method will only work if you’re using Android 4.4 KitKat or earlier (it1407, it1406, it701, it503, or it501) and you lock your phone with a pattern code. If you can’t unlock your phone with after 5 tries, you’ll see a button that says “Forgot Pattern.”
2.Tap “Forgot Pattern.” Now you’ll see a Google login screen.
3. Sign in with your Google username and password. Make sure you are using the username and password for the Google account that’s associated with this phone. An email will be sent to the Gmail account to confirm your identity.
4. Log in to Gmail from another device. You’ll have to use another device with internet access to unlock the phone.
5. Click the link in the message from Google. The email contains a link that you must click to confirm that you are who you say you are.
If you don’t remember your Google password, visit https://www.google.com/accounts/recovery in a web browser.6. Tap “Settings” in the app drawer. Now that you’re back into your phone, you can set a new unlock pattern.
7. Select “Lock Screen.” This option appears under the “Personalization” section of the Settings menu. This will bring you to the “Lock Screen” menu.
8. Select “Screen Security.” This is the first option under the “General” heading.
9. Tap “Screen Lock.” Now you’ll see a menu containing the different methods of locking your screen.

10. Select “Pattern.” Now you’ll see a list of different pattern sizes (e.g., 3x3, 4x4, 5x5). The option you select determines the amount of dots on which you’ll draw your pattern.

  • For example, if you pick 4x4, the unlock screen will show 4 columns of dots and 4 rows of dots.
11. Tap a size and draw your pattern. When the dots appear, drag your finger across the dots in your desired pattern. If you make a mistake, tap “Retry.”
12. Tap “Continue” and confirm your pattern. Now you’ll have to redraw the pattern, just to make sure it matches.
13. Tap “Confirm” to set the pattern. As long as the two patterns match, you’ll return to the Screen Security menu. The next time you unlock your phone, use the pattern you just created.


SECOND METHOD: Performing a Factory Reset
1. Try one of the other methods. If you’re unable to unlock your ITEL phone using one of the other methods, you’ll have to do a factory reset. This will erase everything on the phone except for what is saved to your SD card.
2. Press the power button and select “Power Off.” You’ll want to power the phone all the way down so you can boot into Android Recovery Mode.
3. Hold down the Power and Volume Down buttons at the same time. After several seconds, you can let go. You’ll see an Android icon appear on the screen and the words “No Command".
  • On some ITEL models, you may be brought directly to the Android System Recovery Mode menu without seeing an Android icon.
4. Press the Volume Up button. A black screen will appear containing the header “Android System Recovery Mode.”
5. Use the volume buttons to select “wipe data/factory reset.” The Volume Up button moves the selection bar upward, and the Volume Down button moves it down.
6. Press the Power button to select, then again to confirm. The phone will now go through the factory reset process, which will take several seconds.
7. Press the Power button when you see “Reboot System Now.” When the phone restarts, follow the prompts to set it up as though it’s a brand new phone.

THIRD METHOD: Using Android Device Manager
1. Visit https://www.google.com/android/devicemanager in a web browser. If you set up Android Device Manager when you first set up your ITEL phone, you should be able to unlock it using Android Device Manager. You’ll need to complete most of the steps at a computer that has internet access.
  • This method will only work on phones running Android 5.1 or above.
2. Sign in with your Google username and password. Make sure you’re signing in with the same Google account you used to set up your ITEL phone.
3. Click your ITEL phone. If you see your ITEL phone listed, click it to view its settings. You should now see the options “Ring,” “Lock,” and “Erase.”
  • If you don’t see it, this means you haven’t set up Android Device Manager for this phone. You’ll need to try another method.
4. Click “Lock.” A new screen will appear, prompting you to set a brand new password.
5. Set a temporary password. The password you set here is the one you’ll use to unlock your phone. Don’t worry about filling out the rest of the information on this page, just set a new password. You’ll be able to change once the phone is unlocked.
6. Unlock your ITEL phone. Your ITEL phone should now display a password blank. Type the temporary password you just set, and you’ll be back in to your phone.
7. Tap the Settings app. You’ll find this app either on the home screen or in the app drawer. This is where you’ll be able to set a new password for your phone.
8. Select “Security.” You may have to scroll down a bit to find this option.
  • If you don’t see “Security,” select “Screen Lock.”
9. Tap “Screen Lock.” You’ll be prompted to enter the current password before you can continue. That’s the password you set on the Android Device Manager website.
10. Choose the type of password to set. The options are different depending on the type of phone you have.
  • Select “Pattern” to draw a pattern across a series of dots to unlock your phone.
  • Select “PIN” to set a numerical code (4 digit or more) that you’ll be able to “dial” into the keypad to unlock your phone.
  • Select “Password” to type a password (can be letters and/or numbers) to type using the phone’s keyboard.
11. Follow the prompts to reset your password. The new password will take effect immediately. The next time you sign in to the phone, use the password you just set.
  1. Tap a size and draw your pattern. When the dots appear, drag your finger across the dots in your desired pattern. If you make a mistake, tap “Retry.”
I hope this above methods will be the best option for you to unlock your android phone.

PLEASE YOUR COMMENTS WILL BE HIGHLY APPRECIATED!
THANKS FOR READING!


Sunday, October 15, 2017

How to get the OS 10.2 update

BlackBerry is rolling out OS 10.2 to various countries and carriers starting this week. For those of you who are low on the list and are a bit eager to get your hands on the official version, you can do just that. 
Forums member LopezZ10 has dropped a quick how-to for getting the official version of OS 10.2 on loaded up on your device using Sachesi. Granted some of you may still want to hold out for an officially official version from your carrier for your device, but if you just can't wait to get it, check out this quick tutorial to start using OS 10.2 right now.
As always, make sure you know what you're getting into before you start any of this. Perform a full backup of your device first and don't hold us or anyone else responsible should anything go wrong. If you need help of have questions ask them BEFORE you try this.
To start, you'll need to download and install Sachesi. It's a good idea to remove your SIM and also perform a full backup of your device before you start as well.
1. Plug in your device to you computer using a microUSB cable.
2. Open Sachesi and search for the update using the parameters below. Make sure you use the correct Device and Variant depending on your device.
3. Select "Download All". Remember where you save the folder.
4. When the download is complete, go to the Install tab and select Install: .bar(s)
5. Select the folder with the OS that was downloaded earlier in step 3
6. Wait patiently for the OS to load on your device
It can take 30 minutes or longer to load the OS onto your device, so just hang tight and don't do anything until it's done.
When the process is finished you'll have a shiny new official version of OS 10.2 on your device - enjoy!

Saturday, October 14, 2017

Blackberry Z10 dead or red light blinking done (tested)


This solution awesome for blackberry Z10 when i try in first time in blackberry Z10 then device was dead so try to online update and it is success but in online update many time waiting for that so here simple solution which is first time wait many time when you downloading but after downloading you can easy flash without any risk just few minute only so this is most impotent for everyone one who working in mobile software related and here some impotent notes remember everyone before use this tutorial first of must be charged battery to device up to 80% per. and also working well micro usb cable, working well your computer or laptop usb socket these most impotent if any issue then you can't flashing device

This flash file tested by me without any error working well,  you can use this flash file when your device hang on logo problem, restarting problem, security lock problem, password lock problem, pattern lock problem etc software related problem and you can use this tutorial without any box and this is free for all who know about software in mobile, impotent for flashing first must check your micro usb cable if not good then you can't flash it so check micro usb cable second check your device battery that is impotent for flashing if your device battery low so stop your device between flash so this is impotent for flash, before you flash save your data like contact, photos, videos etc because this is factory flash file so you can't save after full flash so must remember all are impotent notes.

Download Link
Z10_10.3.02.2876_STL100-1 Download here

How to reload the OS on a BlackBerry Z10 or BlackBerry Q10


There are certain times when you may geek out more than you should with your BlackBerry 10 phone and run into some issues. Whether it be a poor-running OS leak, an interrupted security wipe or a somehow nuked device, you may want to downgrade or reload the stock OS. Thankfully, just as in the past, you can still do so on BlackBerry 10. 
With older BBOS devices there was a high chance of "nuking" a device for any number of reasons - bad apps, botched restore, bad software, crappy OS leaks ... you name it. On BlackBerry 10 there is really no chance at all that you'll ever need to reload the OS unless you run across a bad leaked OS or happen to stop a security wipe prematurely.
For both the BlackBerry Z10 and BlackBerry Q10 you can restore the OS to stock when you run into any of these issues. The process unfortunately requires a Windows PC (sorry Mac users) but requires only a few steps to complete. 
You can reload or downgrade the OS on your BlackBerry 10 device one of two ways.
The Easy Way - Reload BlackBerry 10 OS Using BlackBerry Link
  • Open BlackBerry Link and connect your device via microUSB
  • Select Settings (gear icon)
  • Select Reload under Reload Device Software
  • Follow the on-screen instructions to reload the software. When complete you can disconnect your device. 

  • Make sure you have the latest version of BlackBerry Link installed on your Windows PC. 
    After you reload the device software we recommend setting up the device as new to prevent further issues.
    The Harder Way - Reload BlackBerry 10 Using Internet Explorer
  • Make sure you don't have any BlackBerry software running on your PC (BlackBerry Link and BlackBerry Desktop Software)
  • Detach all BlackBerry smartphones, including the BlackBerry 10 device that you are going to restore.
  • Using Internet Explorer navigate to www.BlackBerry.com/updates then scroll down the page and select the Check for Updates button.
  • Connect the BlackBerry 10 device you want to restore
  • Hold the power button for 10 seconds until the device turns off, then press the power button again so it turns on.
  • A prompt will appear and the BlackBerry smartphone will show in the drop down list on your PC shortly after the LED lights up (it could show up as USB: UNKNOWN or USB: BlackBerry (PIN) – both are normal/fine).
  • Click the OK Button as soon as it becomes enabled - you only have a few seconds to do this!
  • Once the above steps are completed successfully a dialog will be displayed stating Checking for BlackBerry Device Software updates
  • Your device power itself off after two minutes. Shortly after, the device LED should turn green.
  • Continue to wait after the LED turns green and you will be prompted to install BlackBerry Device Software. Follow the prompts to install the BlackBerry Software and finish the software installation

  • If for some reason the above steps don't work using BlackBerry Link you can always reload the OS using Internet Explorer. These steps are a bit trickier so read through and make sure you understand everything before you get started. 
    Fire It Up!
    Now you should have a fresh stock OS installed on your device. If for some reason the device still won't boot, try running through either method again until you get it to restore the OS. 
    Of course if you run into further issues you can always get more help on reloading in CrackBerry's BlackBerry 10 OS forum.
    Looking to restore an older BlackBerry OS device? Check here.

    How to Bypass Lock Screen with Android Lock Screen Removal

    n Bypass Lock Screen with Android Lock Screen Removal

    bypass android lock screen hack, bypass android lock screen without google account, bypass android lock screen without reset, how to hack android pattern lock, how to unlock locked android phone without losing data, how to break pattern lock on android phones, how to hack android pattern lock without any software, how to hack a phone password android

    Bypass Lock Screen with Android Lock Screen Removal

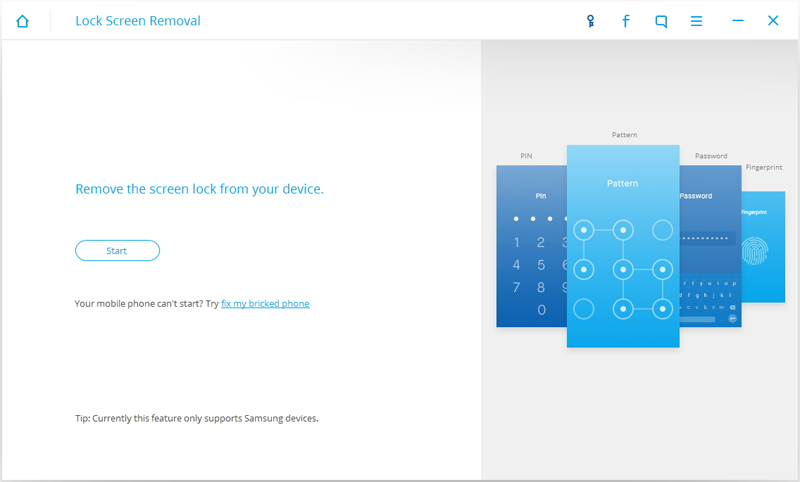
    No matter you forgot the password on your Android lock screen or just get a second-hand device and don’t know the lock screen’s passcode, this Android Lock Screen Removal enables you to get rid of the unknown passcode in 5 minutes, including pattern, PIN, password and fingerprint. Whatever the passcode you choose, you won’t lose any data on your device by removing it with this Android Lock Screen Removal.
    Android lock screen removal

    How to use Bypass Lock Screen with Android Lock Screen Removal

    Developer: Wondershare
    Android Lock Screen Removal

    dr.fone toolkit – Android Lock Screen Removal

    Remove 4 Types of Android Screen Lock without Data Loss
    Features:
    a. It can remove 4 screen lock types – pattern, PIN, password & fingerprints.
    b. No tech knowledge asked, everybody can handle it.
    c. Work for Samsung Galaxy S/Note/Tab series, and LG G2, G3, G4, etc.
    Available on: Windows
    Try Now Buy Now
    Android Lock Screen Removal7 Day Money Back Guarantee
    You can follow the simple steps below to bypass Samsung lock screen pattern, PIN, password and fingerprint.
    Before all the steps, you are supposed to download dr.fone first.
    Link: https://drfone.wondershare.com/android-lock-screen-removal.html
    Price: Free Trial Version
    around $3.3 per month for offical version
    Pros:
    a. 100% Security Guarantee. Only remove the lock screen, no data loss at all.
    b. It provides free lifetime update.
    c. It offers 7 day money back guarantee service.
    Cons:
    The tool works for Samsung and LG devices only.
    SOURCE: wikisir.com

    HOW TO SOLVE BB Z10 RED LIGHT BLINKING...100% working

    First and fore most, watch this video: https://www.youtube.com/watch?v=zeqraPfZM6A
    Use this working auto loader
    Click here 
    here is the link

    STL100-1download

    STL100-2/3 download

    must install black berry link 

    blackberry link here DOWNLOAD

    Wednesday, September 13, 2017

    HOW TO KEEP YOUR PRIVATE PART CLEAN(For Men)

    Previously, I mentioned how women ought to clean their private parts and keep it fresh always, so this post is all about you guys...Yayyy!!!
    Many guys complain that women smell like fish down there, some say it smells like decayed fish, sardines, etc .,
    Guys, the truth is that a lot of you suffer from extreme case of "smelly balls syndrome".
    Please don't bad mouth a woman with poor hygiene if you know you are brewing your own "sewage" down below as well?
    Smelly balls are no joke and can be a potential red flag when it comes down to intimacy andsex.
    Seriously, no woman wants to go down there and pass out from a stench.
    The guide today will serve as a tool to help you improve your personal hygiene.
    I will only discuss this briefly but I encourage anyone with more in-depth suggestions to please leave a comment in the comments section below. If you have a personal question, feel free to send me an email or just post a comment via anonymous and we would get back to you as soon as possible.
    · First of all, make sure your pubic hair is well-groomed/trimmed. Even if you hateshaving or waxing completely, pleaseeeeee endeavour to trim your pubic hair.
    · Using a clean washcloth dampened with warm soapy water, scrub your penis and your balls thoroughly. Do not scrub too hard to avoid irritation and so on.
    · Remember to lift the shaft up and wash thoroughly. Failure to do so can result in accumulation of foul odour. In this step if you are uncircumcised, pull the foreskin away from the head of your penis before washing your penis. Failure to pull the foreskin back will cause in build-up of dead skin cells, dirt, oil and even bacteria, and it is very unhygienic, and can cause infections too.
    · Be sexually responsible. If you are not married, abstinence is the key. Alternatively, use condoms and be faithful to your partner who has been tested and is free from sexually transmitted diseases.
    · The perineum should be given an utmost attention. This is often a part that goes unwashed by some guys. Scrub it thoroughly. This is a part close to your rectum so failure to do so will result in unpleasant odour.
    · When you are done scrubbing, dry yourself with a clean towel and make sure the penis is pat dry too. Apply a dab of lotion. Avoid heavily scented lotions because they can be very harsh on the skin thereby causing irritation.
    · Many guys complain of having smelly balls after working out or sometime during the day before their night shower and so on. The best thing to do for yourself is to keep unscented baby wipes handy at all times. This is a lifesaver because if you are at school or work and notice you have smelly balls, all you have to do is grab some baby wipes and wipe your penis & balls down completely. This will keep you fresh till you get home for another shower.  Lastly, always keep your underwears clean.
    Consult your physician if smell persists***
     
    Below are pictures of underwears 
    Sleeveless shirt (A-shirt)
    A sleeveless garment similar to a T-shirt.
    File:Mentanga.jpg
    A type of thong which has no material around the sides other than the waistband.

    Trunk: These are similar in style to boxer shorts, but are generally shorter and form-fitting like briefs.
     
    Boxers:These have an elasticized waistband that is at or near the wearer's waist, while the leg sections are fairly loose and extend to the mid-thigh.
    Briefs
    Jockey shorts:These have an elasticized waistband at or near the wearer's waist, and leg sections that end at or near the groin.
    File:Jockstrap-20070208.jpg
    Athletic supporter, jock, strap, supporter: Consists of an elastic waistband with a support pouch for the genitalia and two elastic straps affixed to the base of the pouch and to the left and right sides of the waistband at the hip. In some varieties, the pouch may be fitted with a pocket to hold an impact-resistant cup to protect the genitals from injury.
    Note: If these underwears are not worn appropriately, it could cause heat which would likely result to an offensive odour amongst other health risks.

    Sunday, September 10, 2017

    How to Take Care of Your Private Parts - for ladies

    Our private parts are very sensitive and delicate. So we must take care or our private parts properly and carefully. Below showing an image of our private parts so that you can understand properly the name of private parts and follow our steps to take care of private parts.
    private parts
    Daily Washing routine
    Don’t apply soap to vaginal parts directly as it may cause infection in your vagina. Actual vagina i.e. inner parts of vagina don’t need washing as it is self cleaning. We must only wash outer parts of vagina. If needed then we can use clean water to wash inner parts of vagina. To clean outer parts of vagina take a clean cloth and use mild natural soap on it and produce leather in it. Now use your fingers to pull outer lips also called labia from clitoris and then gently and softly clean the parts both side of your clitoris.
    After doing above step clean your vulva using the leathered containing cloth.
    In this step clean your perineum (this is the part between you vagina and anus) and anus and after doing this wash whole vulva with clean water so that leather on the wiped skin will get removed.
    Whenever you use washroom make routine to wash vagina using water after using washroom. Because drops of urine which remains in the vagina may cause irritation or infection in the vagina
    Wash you private parts daily in the manner above explained. It will keep your private parts clean and infection free.
    Trim, Wax or shave private parts
    To keep our private parts we must remove hairs in routine mannered. We can remove hairs on vulva using trimming or waxing or shaving (use women razor to for shaving for safety purposes). Because more hairs down may cause odor problem and during summers it may cause infection in the vagina.
    Keep private parts clean during periods
    As we know during periods we use pads or tampons. But we must take care of one thing that when to change pad because putting one pad for long time period may cause infection in the vagina. So we must keep in mind the direction provide on the pads cover so keep vagina infection free.
    Change under garments daily
    To keep our private parts clean and infection free we must change our under garments daily and use good stuff  for under garments  because bad stuff may cause irritation or infection in the private parts as private parts are very sensitive and delicate.
    Always wipe from front to back
    After using the washroom we must wipe in a proper way. We must wipe from front to back so that germs from rectum don’t get spread to vagina.  Doctors also recommended this way of wiping after using toilet.  Also don’t use same piece of tissue paper or toilet paper again.
    Always keep private parts dry
    Bacterial always develop in moist area. So always keep your vaginal parts dry to get rid of bacterial infection. So make your vagina dry after using washroom to get rid of infection.
    Pee after sex
    If you are not looking for pregnancy then pee after sex. Doctors recommended this because after having sex bacterial may transfer to your urethra. So pee immediately has sex to get rid of bacterial causing infection in the vagina.
    Avoid douches and feminine hygiene sprays
    Many women use douches to fee clean and fresh. But they actually imbalance the bad and good bacterial balance and these leads to bacterial infection in the vagina. So use these sprays or douches after consulting the doctors to get rid of infection down.

    How to bypass frp (Google account lock) on ZTE Z812


    Here is just another tutorial on how to bypass Factory Reset Protection (Google Account Lock) on ZTE Z812.
    This method is no only for this phone it can also be used on other devices.

    Note
    This tutorial assumes that your are the owner of the phone I'm not responsible for how this tutorial is used
    Use at your own peril........ Connect to any working WiFi connection. Select any typing space, the press and hold @ button on keyboard. Touch the small setting icon that appear. Select Google Keyboard Settings > Text correction> Personal Dictionary > For all languages Now click the plus (+) icon then add a new word. When you have added the word, click the search icon. On the search bar, type in lang then select Language from the search result. Now under language & input page, scroll down and select Text-to-Speech output. Select the settings icon near Google Text-to-speech. Select install voice data. Under Google TTS voice data, touch the 3 dot icon and select open source licenses. Press and hold any word on the license page then press search button. Use Google App for the search. Type in file on the search bar and then select file manager. Now navigate to SDcard and install frp bypass apk. Launch frp bypass You will now see a Re-type password page Tap the 3 dots at top right and select Browser Sign-in Tap OK and sign in your Account. Reboot device and setup as usual. The following screenshots below shows how to do this with ease.

    how to run whatsapp on your pc/laptops

    How do I use WhatsApp Web?

    Image result for how to run whatsapp on pc
    To provide you with a richer communication experience, WhatsApp is now accessible both on your phone and your computer. WhatsApp Web is a computer based extension of the WhatsApp account on your phone. The messages you send and receive are fully synced between your phone and your computer, and you can see all messages on both devices. Any action you take on the phone will apply to WhatsApp Web and vice versa. At this time, WhatsApp Web is available only for AndroidiPhone 8.1+Windows Phone 8.0 and 8.1Nokia S60Nokia S40 EVOBlackBerry and BlackBerry 10 smartphones.
    WhatsApp Web is not another WhatsApp account. When you use WhatsApp on your computer and your phone, you are simply accessing the same account on these two devices.
    Minimum requirements to enjoy WhatsApp Web
    • You need to have an active WhatsApp account on your phone.
    • You need to have a stable internet connection on both your phone and your computer.
    • You need to use the latest version of Chrome, Firefox, Opera, Safari or Edge as your web browser on your computer.
    To get started with WhatsApp Web
    1. Visit web.whatsapp.com on your computer.
    2. Open WhatsApp on your phone. 
      • On Android: in the Chats screen > Menu > WhatsApp Web.
      • On Nokia S60 and Windows Phone: go to Menu > WhatsApp Web.
      • On iPhone: go to Settings > WhatsApp Web.
      • On BlackBerry: go to Chats > Menu > WhatsApp Web.
      • On BlackBerry 10: Swipe down from top of the screen > WhatsApp Web.
      • On Nokia S40: Swipe up from bottom of screen > WhatsApp Web.
    3. Scan the QR Code on your computer screen from your phone.
    From your phone, navigate to WhatsApp Web to view your logged in computers or to logout from an active WhatsApp Web session.
    Note: To avoid data usage charges on your phone, we recommend that you are always connected to Wi-Fi when using WhatsApp Web.

    To install on Windows 8+ 

    1. On your computer’s browser, navigate to the download page to download the .exe file.
    2. Once the download is complete, open WhatsApp.exe to install WhatsApp on your computer.
    3. When the install is complete, launch WhatsApp on your computer and scan the QR code to log in.

    To install on Mac OSX 10.9+

    1. On your computer’s browser, navigate to the download page to download the .zip file.
    2. Once the download is complete, open the zip file to run WhatsApp.app.
    3. On your first install, the application will prompt if you would like to add WhatsApp to your Applications folder and your desktop dock.
    4. When the install is complete, launch WhatsApp on your computer and scan the QR code to log in.
    Alternatively, you may download and install it via Apple App Store
    To scan the QR code
    • On Android: Chats screen > Menu > WhatsApp Web.
    • On iPhone 8.1+: Settings > WhatsApp Web.
    • On Windows Phone 8.0+: Chats screen > Menu > WhatsApp Web.
    Note: ARM processors and Linux based systems are not supported.

    Thursday, September 7, 2017

    How to view saved Wi-Fi password on android, iOS and PC

    how to view saved wifi password on android
    Wi-Fi has become the most common use in the current era but with everything going on with people’s busy life, they don’t tend to remember their saved Wi-Fipassword and keep up with but sometimes it can be really important to connect other devices and being able to find a basic solution on your own.
    You too can be able to do so, follow our instruction underneath and know how to view saved Wifi password on Android, iOS, and PC.

    2. How to View saved WiFi Password on PC while connected to the internet (Windows 7, 8 and 10)

    • Right click on the Wi-Fi icon in System Tray of your Windows Taskbar
    how to view saved wifi password
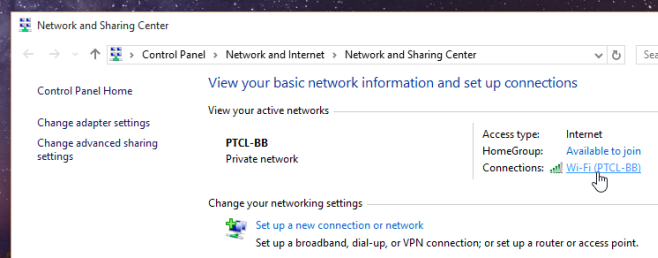
    • Open Network and Sharing Center (you can see your connected network with basic network infos)
    how to view saved wifi password on pc
    • Click on the network you are connected to initiated under your active networks
    wi-fi wireless prop
    • Wi-Fi Status Dialog-box will be displayed, click on Wireless Properties
    • You will encounter further wireless properties select Security tab
    • You will see the Network security key hidden, make it visible by checking on show characters

    2. How to View saved Wi-Fi Password on PC of previously connected network

    • Run Command Prompt with administration access (Start–>Run–>cmd)
    • Type command: “netsh wlan show profiles” to view your saved Wi-Fi profiles
    • Type command:” netsh wlan show profilename=Your_SSID key=clear
    Insert the valid SSID in place of Your_SSID from the saved Wi-Fi profiles
    how to view saved wifi password on ioswifi-password cmd2
    Instead of Following the mentioned process you can also download various available password viewing software on internet. Some of our recommendations are:
    Finding the saved password from PC is easy but it is a massive trouble when it comes to smartphones. So, Here’s our method on how to view saved WiFi password on Android smartphones. Before we begin keep this in mind that this process will only work on the android device having root authentication and on iOS device that are jailbreaked.

    Viewing saved Wi-Fi password on iOS

    • Install the application called NetworkList or WiFi passwords from Cydia
    • After installation go to Wi-Fi settings
    • You will see a new option as Network Passwords or Known Networks
    • Clicking on the option allows you to view your saved network password
    how to view saved wifi password iphone
    NetworkList: Download here!
    Wifi passwords: download here!

    Viewing Saved Wi-Fi password on Android

    • Make sure you have installed a free file explorer app ES File Explorer
    • Direct to the path data/misc/wifi from the root directory
    • Open the file wpa_supplicant.conf from the wifi folder
    • Built-in html/txt viewer of ES File Explorer and root authentication allows you to view network’s SSID and password.
    Caution: Do not Edit the file or you may have  trouble connecting to your network
    how to view saved wifi password on android


    wi-fi password wpa


    ES File Explorer: download here!